
Building an Igloo
| The word "igloo" means "house", not necessarily a dome-shaped snow house. Igloos can have walls constructed of snow, ice or rock with roofs constructed of canvas, hides or snow blocks. |
Because most of the Arctic has a desert-like environment, there actually is little snow fall. Until there has been an appreciable accumulation of snow, igloos, as we usually think of them, cannot be built. That is why igloos were traditionally constructed with ice block walls at the beginning of winters.
The snow igloo is constructed of blocks of snow. The snow therefore has to be compact and evenly textured throughout. It should not be layered with different textures that will tend to split apart. The larger the snow block the better the igloo will be, both in strength and size.

LIGHT PASSES THROUGH THE SNOWBLOCK WALLS,
MAKING THE INTERIOR SURPRISINGLY BRIGHT. |
The first task in building a (snow) igloo is to find suitable snow. Once found, scribe a circle in the snow to the size of igloo desired. This circle will guide you in laying the first row of snow blocks. In fact, that's not really an accurate statement. Igloos are not made of row upon row of snow blocks but rather are constructed of a single spiral. Depending on whether the person building the igloo is right or left handed will determine the direction of the spiral.
As it is desirable to have large snow blocks, use a standard wood-cutting saw that has a blade of at least two feet in length. Cut/saw blocks 6 to 8 inch thickness, cut into lengths that are manageble to handle, then saw the base of the blocks to extract. Use half of the interior of the igloo to make the first blocks and leave the other half untouched; this will become your sleeping platform.
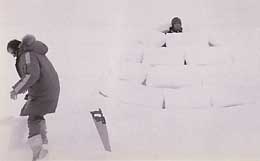
DOUG STERN (INSIDE) AND CAMERON TRELEAVEN
BUILDING IGLOO |
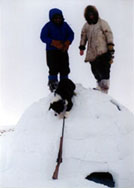
When the half of the interior has been exhausted of snowblock material, the rest of the blocks will need to be carved from snow on the exterior of the house. A second person outside cutting blocks speeds up construction significantly. A tunnel leading to the igloo will be a desirable feature, so cut blocks from the area on the side where the door will be. You will need more snow blocks than you might think, but the more blocks cut and removed, the easier it becomes to access suitable snow.
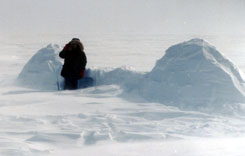
 A WELL-BUILT IGLOO OFFERS A VANTAGE POINT FOR SEEING DISTANCES IN THE FLAT LANDSCAPE. |
The first block should not be very tall, with each succeeding block being taller, forming a gradually rising base. Always place the blocks topside up so that the original bottom of one block sits on the original topside of the blocks beneath. This aids the blocks to stick together. As each block is put in place, trim the adjoining surfaces with a snow knife (e.g., machette) and push together with your free hand. As the walls get higher the blocks should angle in towards the centre more and more until there is only an opening in the centre of the roof small enough that only one or two blocks will be needed to fill the space. These last blocks will be laid horizontally (if everything worked as it should) and have their edges shaped like a keystone.
Now that the walls are built, did you notice that there is no door? Use your snow knife to cut a semi-circular door in the base of the wall that leads out of the half of the house where snow blocks were extracted. An exterior tunnel can also be constructed that leads to the doorway. This will help prevent gusts of wind blowing snow and cold air inside.
ADJOINING IGLOOS. |
The job is not finished yet. On the outside of the igloo there will likely be places needing chinking, followed by shovelling snow over the entire structure to help insulate. If you intend to use a stove inside to either cook or as a heat source, drill a small hole into the roof to avoid carbon monoxide poisoning, especially if you intend to close off the door when inside.
If you are really ambitious (and need the extra space) build more than one igloo close to each other and connect with tunnels, or simply build side by side with connecting doorways. Even though the interior will be surprisingly light, a block of ice installed into the side of the igloo will make it even brighter. Cut out a section of the wall roughly the shape of the ice block, and slightly smaller, then trim the snow until the ice wedges itself into place.
The sleeping platform is now a raised area compared to where you enter the igloo. Because heat rises and cold settles, the entrance area will act as a cold trap whereas the sleeping area will hold whatever heat is generated by your stove, lamp or just body heat.
|
|
